Quick Links
/home/nametag/public_html/nametag.com/Cart/Includes/Objects/MySQLi.inc 37 $this->MyDB = string(7) "nametag"
/home/nametag/public_html/nametag.com/Cart/Includes/Objects/MySQLi.inc 40 $this->MyServer = string(9) "127.0.0.1"
/home/nametag/public_html/nametag.com/Cart/Includes/Objects/MySQLi.inc 43 $this->MyUser = string(4) "cart"
/home/nametag/public_html/nametag.com/Cart/Includes/Objects/MySQLi.inc 46 $this->MyPass= string(9) "540pp1NG!"
1754163486.5283>Begining construction of mysql class
/home/nametag/public_html/nametag.com/Cart/Includes/Objects/MySQLi.inc 50 $this->MyConnectionID = object(mysqli)#4 (18) {
["affected_rows"]=>
int(0)
["client_info"]=>
string(14) "mysqlnd 8.2.18"
["client_version"]=>
int(80218)
["connect_errno"]=>
int(0)
["connect_error"]=>
NULL
["errno"]=>
int(0)
["error"]=>
string(0) ""
["error_list"]=>
array(0) {
}
["field_count"]=>
int(0)
["host_info"]=>
string(20) "127.0.0.1 via TCP/IP"
["info"]=>
NULL
["insert_id"]=>
int(0)
["server_info"]=>
string(5) "8.1.0"
["server_version"]=>
int(80100)
["sqlstate"]=>
string(5) "00000"
["protocol_version"]=>
int(10)
["thread_id"]=>
int(63002)
["warning_count"]=>
int(0)
}
It's a pleasure to be able to call with a question and have it addressed pleasantly, answered precisely, and to feel confident in proceeding with an order! Your representative "Rainbow" is an asset to be treassured!
Anonymous
April, 2019
Name Tags
Always a pleasure doing business with you! Thanks and Happy Holidays!
Anonymous
December, 2016
Name Tags
It is always a pleasure to work with your company. The online platform is easy and efficient to use. All of the necessary information is also provided when placing the order. Thank you.
Anonymous
January, 2020
Name Tags
The ordering process was so efficient and so easy! Thanks! I am glad I found you...my staff will look professional and elegant at the same time!
Anonymous
January, 2018
Name Tags
As a business owner I liked that you had a good BBB rating.
Anonymous
January, 2019
Name Tags
I used the chat feature and it was very fast and helpful. Great customer service!
Anonymous
May, 2017
Name Tags
I love your customer service
Anonymous
February, 2017
Name Tags
Quick and easy! Thanks!
Anonymous
November, 2017
Name Tags
quick simple and to the point
Anonymous
June, 2018
Name Tags
Easy to use!
Anonymous
October, 2017
Name Tags
Very easy. Loved the speed at which I could reorder a product we use regularly!
Anonymous
April, 2017
Name Tags
Very easy reorder process. Thank you!
Anonymous
November, 2019
Name Tags
It made it easy to reorder.
Thank you!
Anonymous
September, 2018
Name Tags
The online order form is very easy to use and the chat window was available to answer any additional questions.
Anonymous
July, 2017
Name Tags
The product looked great compared to samples we ordered from other suppliers for comparison. The price was higher than the others but the quality was superior.
Anonymous
September, 2017
Name Tags
This is a reorder. We were very pleased with the appearance, price, and quality of our first order
Anonymous
April, 2017
Name Tags
Templates and Instructions for Insert Printing
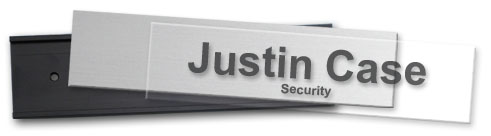
Name Tag, Inc. offers templates to help you print your inserts. Download these templates from this page, checking that you have the correct product and size. There is also information on creating your own templates.
- Enter Information: Download the template and personalize each insert using the software of your choice. OpenOfficeâ„¢ was used to set up our templates; adjustments may be needed when using another software program. DUE TO VARIABLES IN HOW DOCUMENT SOFTWARE IS CONFIGURED, WE DO NOT OFFER TECHNICAL SUPPORT FOR ANY TEMPLATES.
- Test Print: First, print one page of your file to a plain sheet of paper. Mark the top and front of the page as it prints relative to the feed tray. Second, check that the position of the printing correctly lines up by placing the printed page underneath a blank sheet of inserts and holding it up to a light source.
- Print: We recommend printing one sheet at a time to avoid print or feed errors. To begin printing, place a single insert sheet into the printer, noting the top and front of the page as determined in your test print.
- Separate: Gently fold back and forth along the perforation to make the inserts easier to separate, then carefully tear them apart.
- Assembly: Your inserts are now ready to place into your product. Slide them into the top of the reusable badges or holders. Some products come with a transparent cover that slides in over the insert. You may need to remove a thin protective layer of film on the cover for some products before assembling your badge.
- Note: Name Tag, Inc. is not responsible for any damage to printing equipment; please review your equipment manual for product suitability.
PRINTING INSTRUCTIONS (PDF)
Mighty Badges™
Templates have been set up using Microsoft® Word or OpenOffice™ to assist you in printing inserts for some of the most common sized Mighty Badges™.
Standard Badges (1x3 inches)
Medium Plus Badges (1.5x3 inches)
Large Badges (1.5x2.75 inches)
Boomer Badges (2.12x3.37 inches)
Large Oval Badges (1.7x2.57 inches)
Speedy Badges and Clear Reusable Badges
Badge Holders
Choosing the correct template is as easy as looking at the perforation marks on your insert sheet. If you only see marks on the bottom or right sides of the inserts, choose the Flush Top and Edge. If the perforation marks create a small border around the entire sheet, select your size from the Centered templates.
Flush Top and Edge
Centered
Reusable Name Plates
Select the template you need based on the type of insert you have purchased and the size of your name plates. Templates have been set up using Microsoft® Word or OpenOffice™.
Peel Off & Paper Inserts
Peel off and paper inserts have a paper backing that stabilizes the inserts so each insert sheet can be sent through a printer multiple times.
Classic Punch Out Inserts
After an insert is printed you punch it out, leaving a hole in the transparent insert sheet. We do not recommend sending a partial insert sheet through your printer.
Contemporary Name Plates
Create Your Own Templates for Use With Mail Merge
The links below will open instructions for two of the most popular document software. Follow these instructions and insert the dimensions we have provided below.
Microsoft® Word: https://support.office.com/en-us/article/set-up-a-new-mail-merge-list-with-word
OpenOffice™: http://wiki.services.openoffice.org/w/images/0/05/0211WG3-UsingMailMerge.pdf (p. 13)
Standard Mighty Badges (1x3 inches)
Top Margin: 0.56"
Side Margin: 0.60"
Vertical Pitch: 1.00"
Horizontal Pitch: 4.20"
Label Height: 1.00"
Label Width: 3.00"
Number Across: 2"
Number Down: 10"
Medium Plus Might Badges (1.5x3 inches)
Top Margin: 1.00"
Side Margin: 0.63"
Vertical Pitch: 1.50"
Horizontal Pitch: 4.25"
Label Height: 1.5"
Label Width: 3.0"
Number Across: 2"
Number Down: 6"
3x4 inch Badge Holders
(Discard area to the bottom and right)
Top Margin: 0"
Side Margin: 0"
Vertical Pitch: 3"
Horizontal Pitch: 4"
Label Height: 3"
Label Width: 4"
Number Across: 2"
Number Down: 3"
2.25x3.5 inch Badge Holders
(Discard area to the bottom and right)
Top Margin: 0"
Side Margin: 0"
Vertical Pitch: 2.25"
Horizontal Pitch: 3.5"
Label Height: 2.25"
Label Width: 3.5"
Number Across: 2"
Number Down: 4"